913.ai quick start guide
Agents automate workflows by starting with triggers (events like file uploads), processing data through tasks (extraction, classification, generation) and performing actions (e.g., saving, renaming, or transferring files) every time the trigger occurs.
Why should I build an Agent?
Use Agents to automate your repetitive document workflows without code, saving you time and resources. Whether you want to automate a simple task, like extracting key data from uploaded documents, or build an entire system, like managing compliance workflows, Agents can handle it for you. This frees up your time to focus on more important work. Build the system, don’t be the system.
How to build an Agent with 913.ai?
Use 913.ai's Axon Library to browse axons (Axons are individual steps the agent takes) and see all of the triggers, tasks and actions available. Combine a trigger with one or more tasks & actions to tailor your workflow to your needs.
You can build Agent by:
Using Lyrics by simply explaining your workflow in natural language.
Custom-building a Agent in the Agent Builder.
Using 913.ai's pre-built Agent templates in Agent Library.
Copying and pasting axons from another Agent.
Then, you can customize your Agent using Axons in Agent Builder.
Blank Agent
You can use a blank Agent to create your Agent from scratch in the Agent Builder. In your app.913.ai account, hover over the left sidebar menu and click Agent Builder.
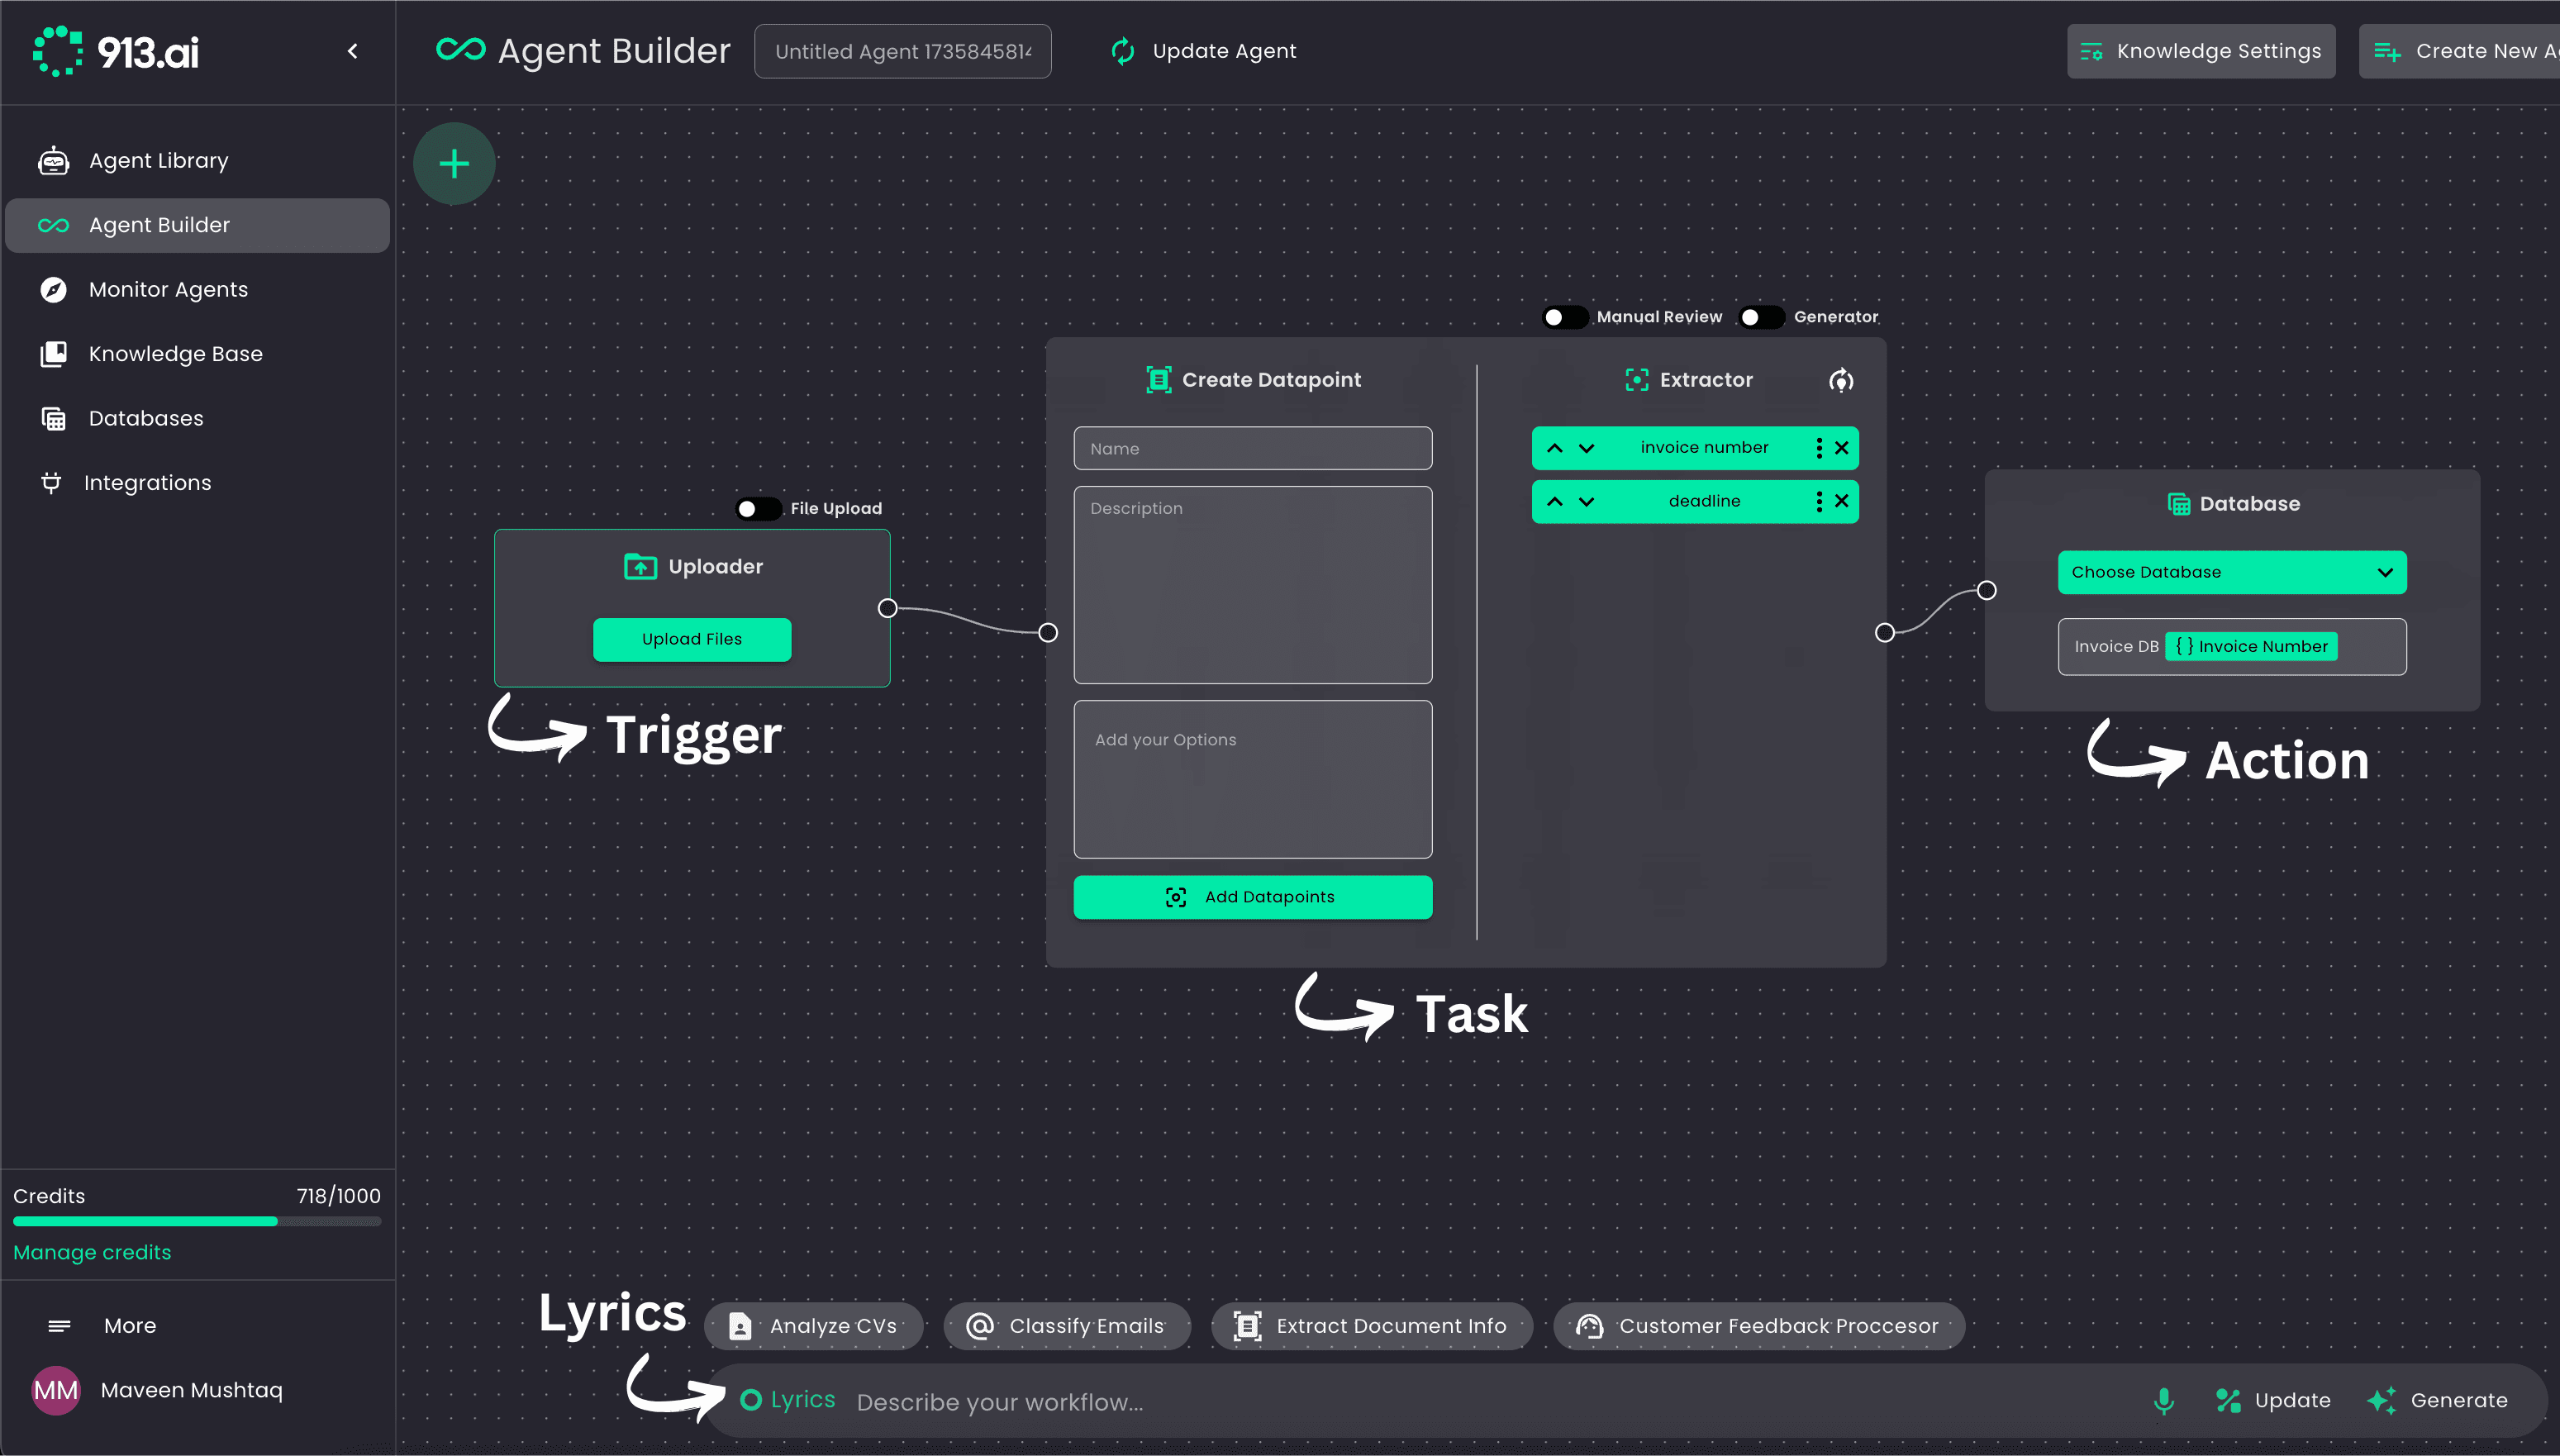
Set up your trigger
The trigger is the event that starts an Agent. For example, a trigger can be each time you upload a file using Uploader or receive a new email.
Add Tasks
Tasks are the processing a Agent performs after it is triggered. For example, an task can be to extract information from the document using Extractor by defining the datapoints you wanna extract.
When an Agent runs, each file/data is processed one at a time through the workflow—for example: starting with the uploader, then moving to extraction, classification, and so on. Each step in the process uses credits, whether it’s extracting data, classifying information, or performing another action. This ensures precise and efficient handling of every file/data.
Add Actions
Action Axons are the final step in the workflow. These Axons define where and how the processed data is sent or stored, completing the agent’s workflow. They can handle file storage, data transfer, or communication tasks.
Customizing Your Agent: Placeholders and Variables
You can make your Agent smarter and more tailored to your needs by using placeholders and variables. Here’s how they work:
Placeholders: Use Results from Your Agent
Placeholders allow you to use data generated by your Agent in different steps of the workflow. This could include:
Results from the Agent itself.
Datapoints from previous steps.
Custom results you’ve added.
and more.
How to Use Placeholders:
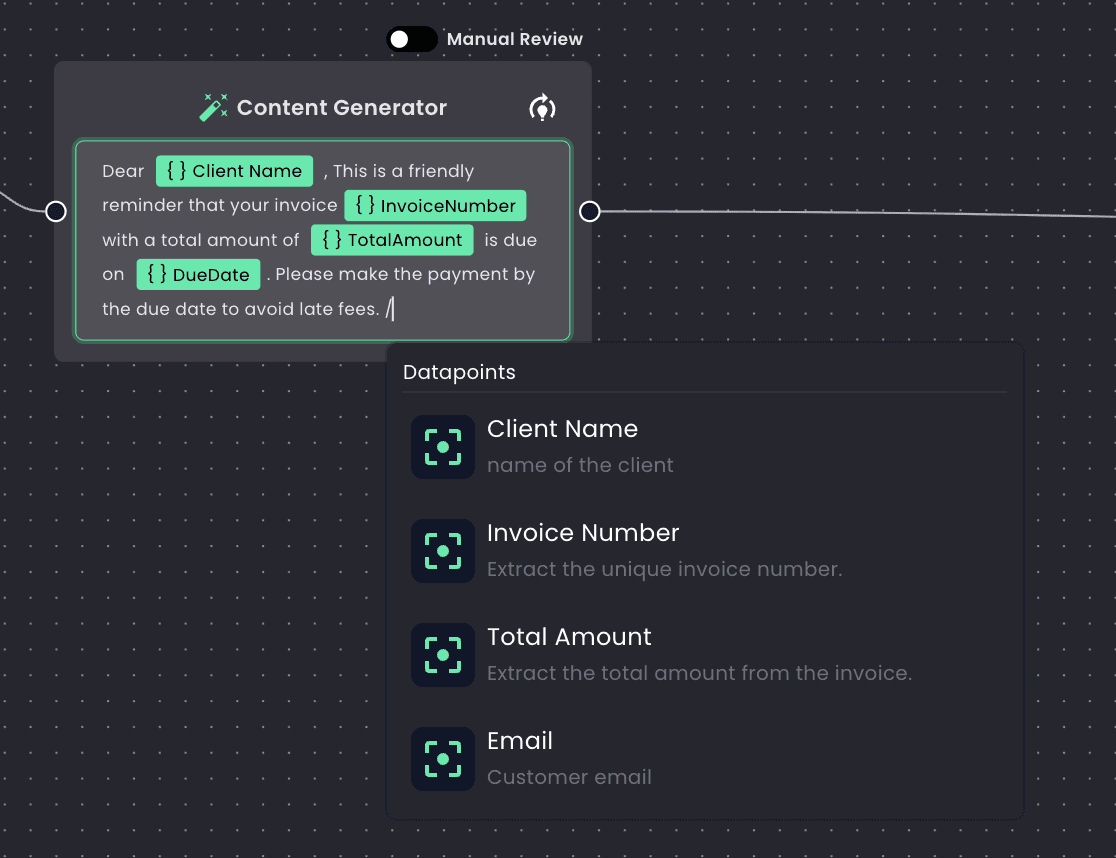
• Simply press ‘/’ (slash) while inside any text field. This will open a list of options, such as results from earlier steps or specific datapoints & variables.
• Select the datapoint or placeholder you want, and the placeholder will be inserted into your workflow.
Example: Using Placeholders in Your Agent Workflow
Let’s say you’re processing invoices and want to extract key details like the invoice number, total amount, and due date. Here’s how you can use placeholders to make the workflow dynamic and reusable:
Step 1: Upload a Document
You start by uploading an invoice using the uploader. This will trigger the Agent and send the document to the extractor.
Step 2: Extract Key Details
Set up data points in the extractor for the specific details you want:
• Datapoint Name: Invoice Number
• Description: “Extract the unique invoice number.”
• Datapoint Name: Total Amount
• Description: “Extract the total amount from the invoice.”
• Datapoint Name: Due Date
• Description: “Extract the payment due date.”
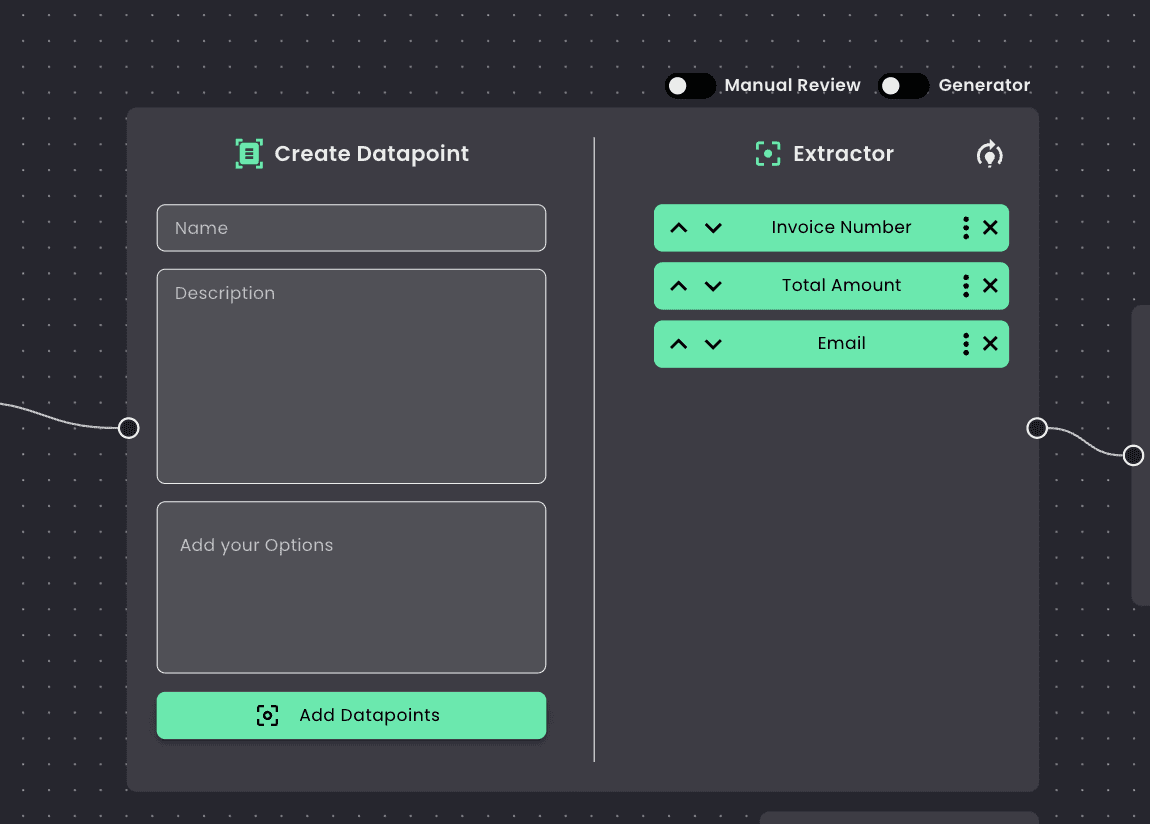
The extractor processes the uploaded document and extracts the specified details for each datapoint.
Step 3: Use Placeholders in a Content Generator
Once the extractor has gathered the data, you can use placeholders to dynamically insert these results into the next step, such as generating an email or report. For example:
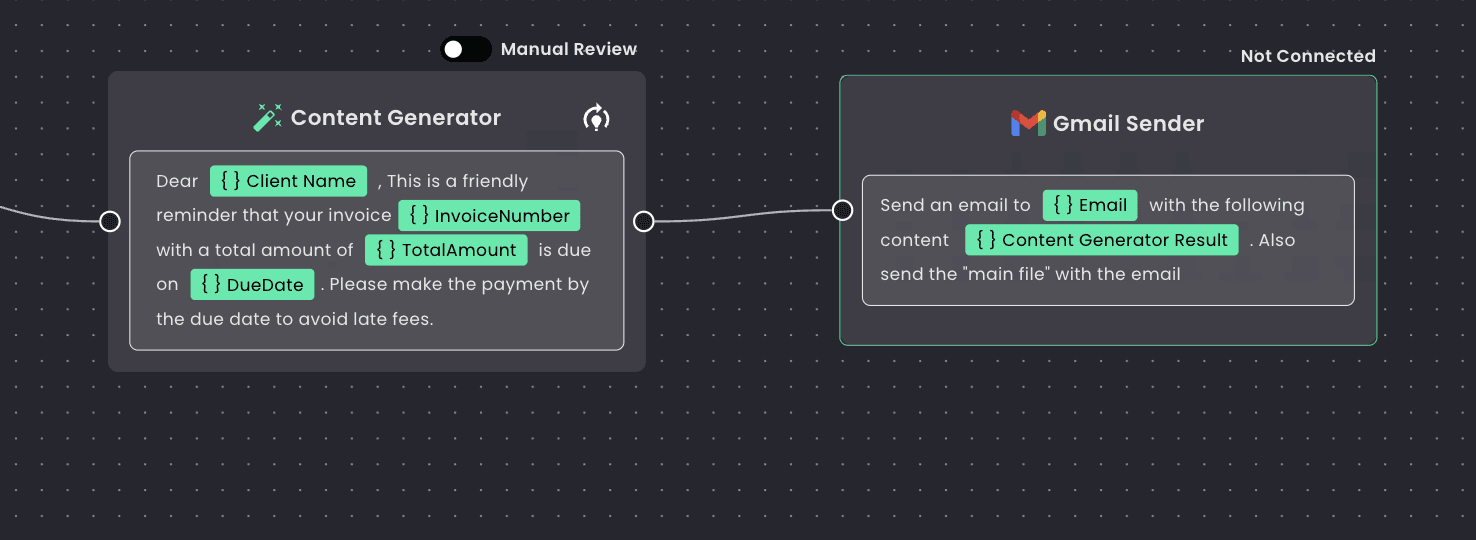
Generate an Email Reminder: In the content generator, you can draft an email template like this:
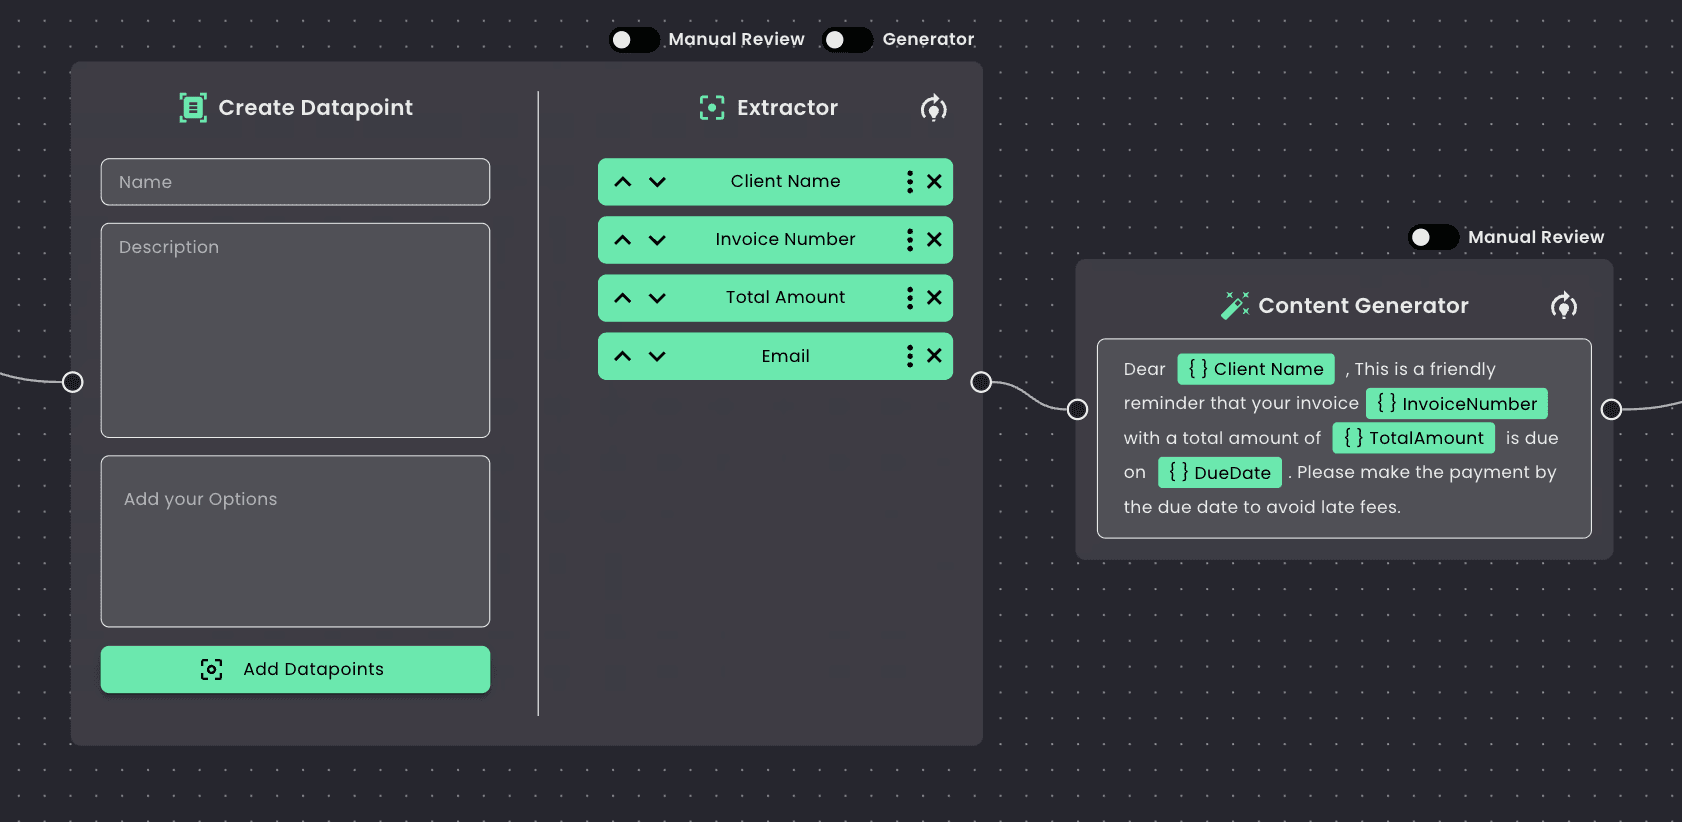
• To insert the extracted data, press ‘/’ in the content field, select Invoice Number, Total Amount, or Due Date, and the placeholder will automatically insert the relevant value from the extractor.
Step 4: Perform an Action
The Agent can then send this email to the client including the invoice, all you need to do is mention "main file" in the prompt which refers to the file that agent is processing.
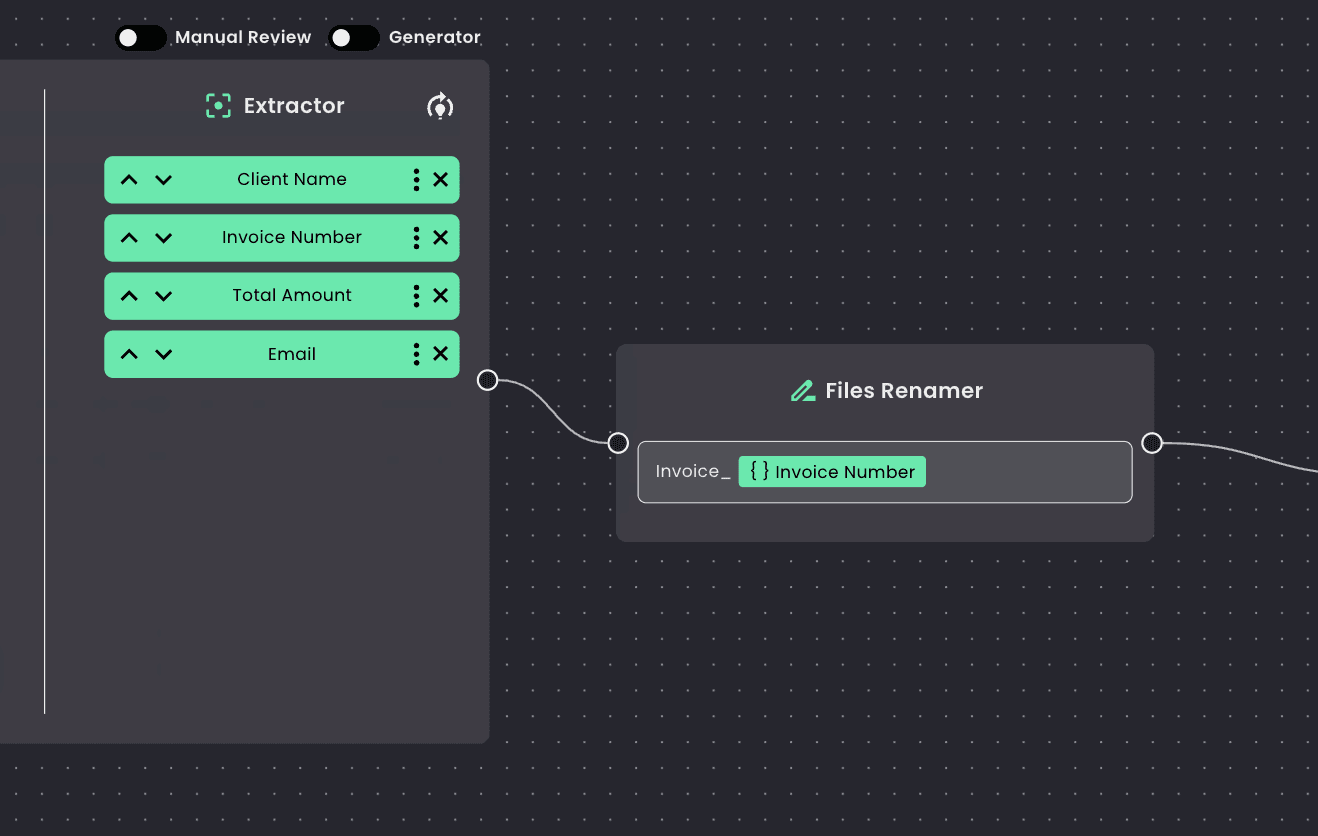
You could also use placeholders to rename the file dynamically, such as:
Why Placeholders Are Useful
• Dynamic Outputs: Placeholders let you reuse data extracted earlier in real-time, ensuring your workflows are flexible and personalized.
• Consistency: You don’t need to re-enter data or hard-code values—the Agent automatically pulls the correct information.
• Time-Saving: By linking placeholders to data points, you can quickly create outputs like emails, file names, or reports with minimal effort.
Placeholders allow you to use the results of one step in subsequent steps seamlessly. Try it out by pressing ‘/’ in your workflow and see how easy it is to build smart, automated processes!
Variables: Create Your Prompt Library
Variables act as your personal library of predefined terms or descriptions that you can reuse throughout your Agent.
How to Create and Use Variables:
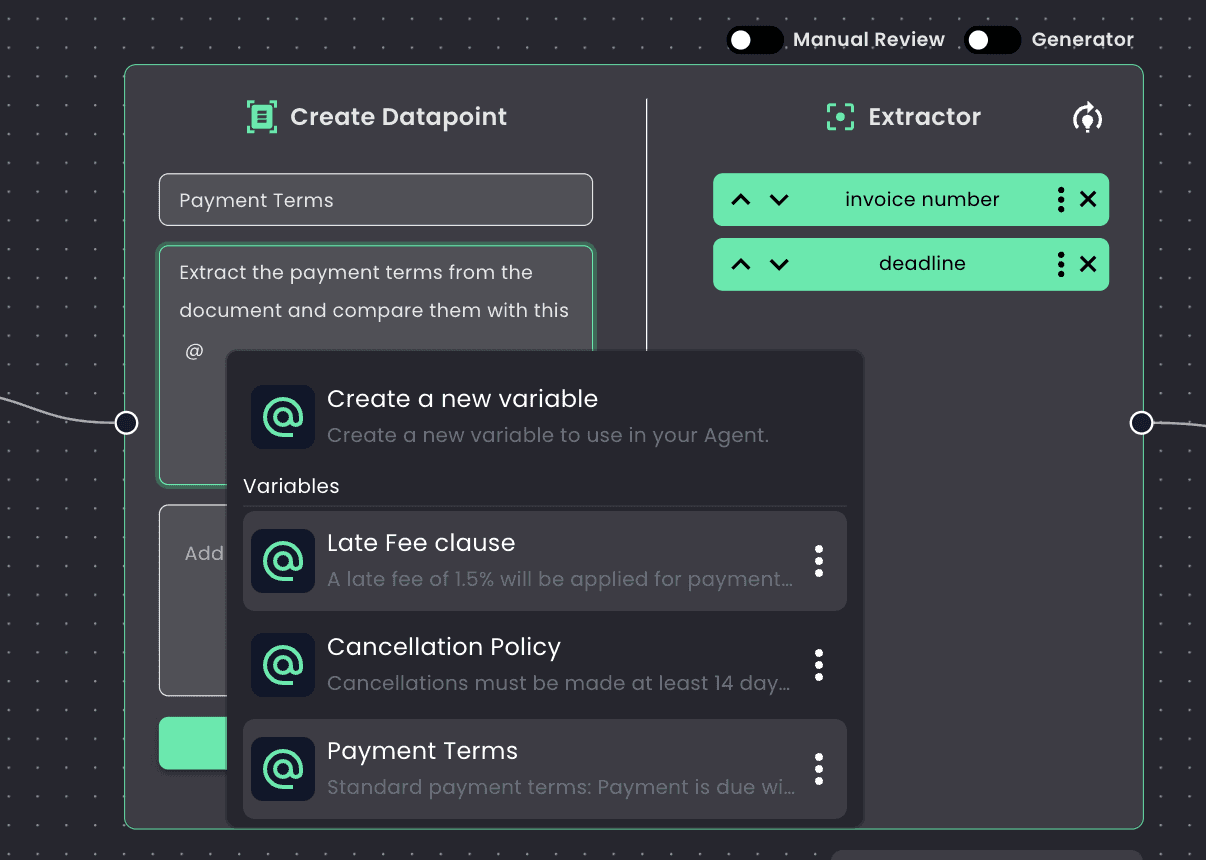
1. Define a Variable: Let’s say you want to compare extracted invoice data to a predefined standard. You can create a variable called Invoice Standard and add a description, such as the expected format or value for the invoice number.
2. Insert a Variable: Press ‘@’ (at sign) in any field, and you can select the variable to include it.
3. When the Agent runs, it will automatically use the description tied to that variable wherever you’ve inserted it.
Why Use Variables?
Variables save time and keep your prompts consistent. They’re perfect for frequently used terms or conditions you want to apply across different steps.
How It All Comes Together
1. Upload a Document: Use the uploader to bring your document into the Agent. This could be an invoice, contract, or any file.
2. Set Up an Extractor: Define datapoints to specify what information you want to extract. For example:
• Datapoint Name: Invoice Number
• Description: “Extract the invoice number from the document.”
• Datapoint Name: Invoice Date
• Description: “Extract the invoice date from the document.”
• Continue adding datapoints for all the information you need, like Total Amount, Client Name, etc.
Once configured, the extractor will automatically extract all the defined information from the document.
3. Use a Content Generator: After the extractor has processed the document, you can use a content generator to create outputs based on the extracted results.
• Use placeholders by pressing ‘/’ and selecting a datapoint, such as Invoice Number or Total Amount, to include the extracted information in the content.
4. Incorporate Variables: If you need to apply predefined terms or descriptions, such as a standard clause or formatting rule, you can insert variables by pressing ‘@’. For example, you can add a variable called Payment Terms and use it across multiple steps in your workflow.
5. End with Actions: Once the workflow is complete, the Agent can perform actions like saving the extracted data to a database, renaming files, or transferring them to another system.
Here is the complete agent:
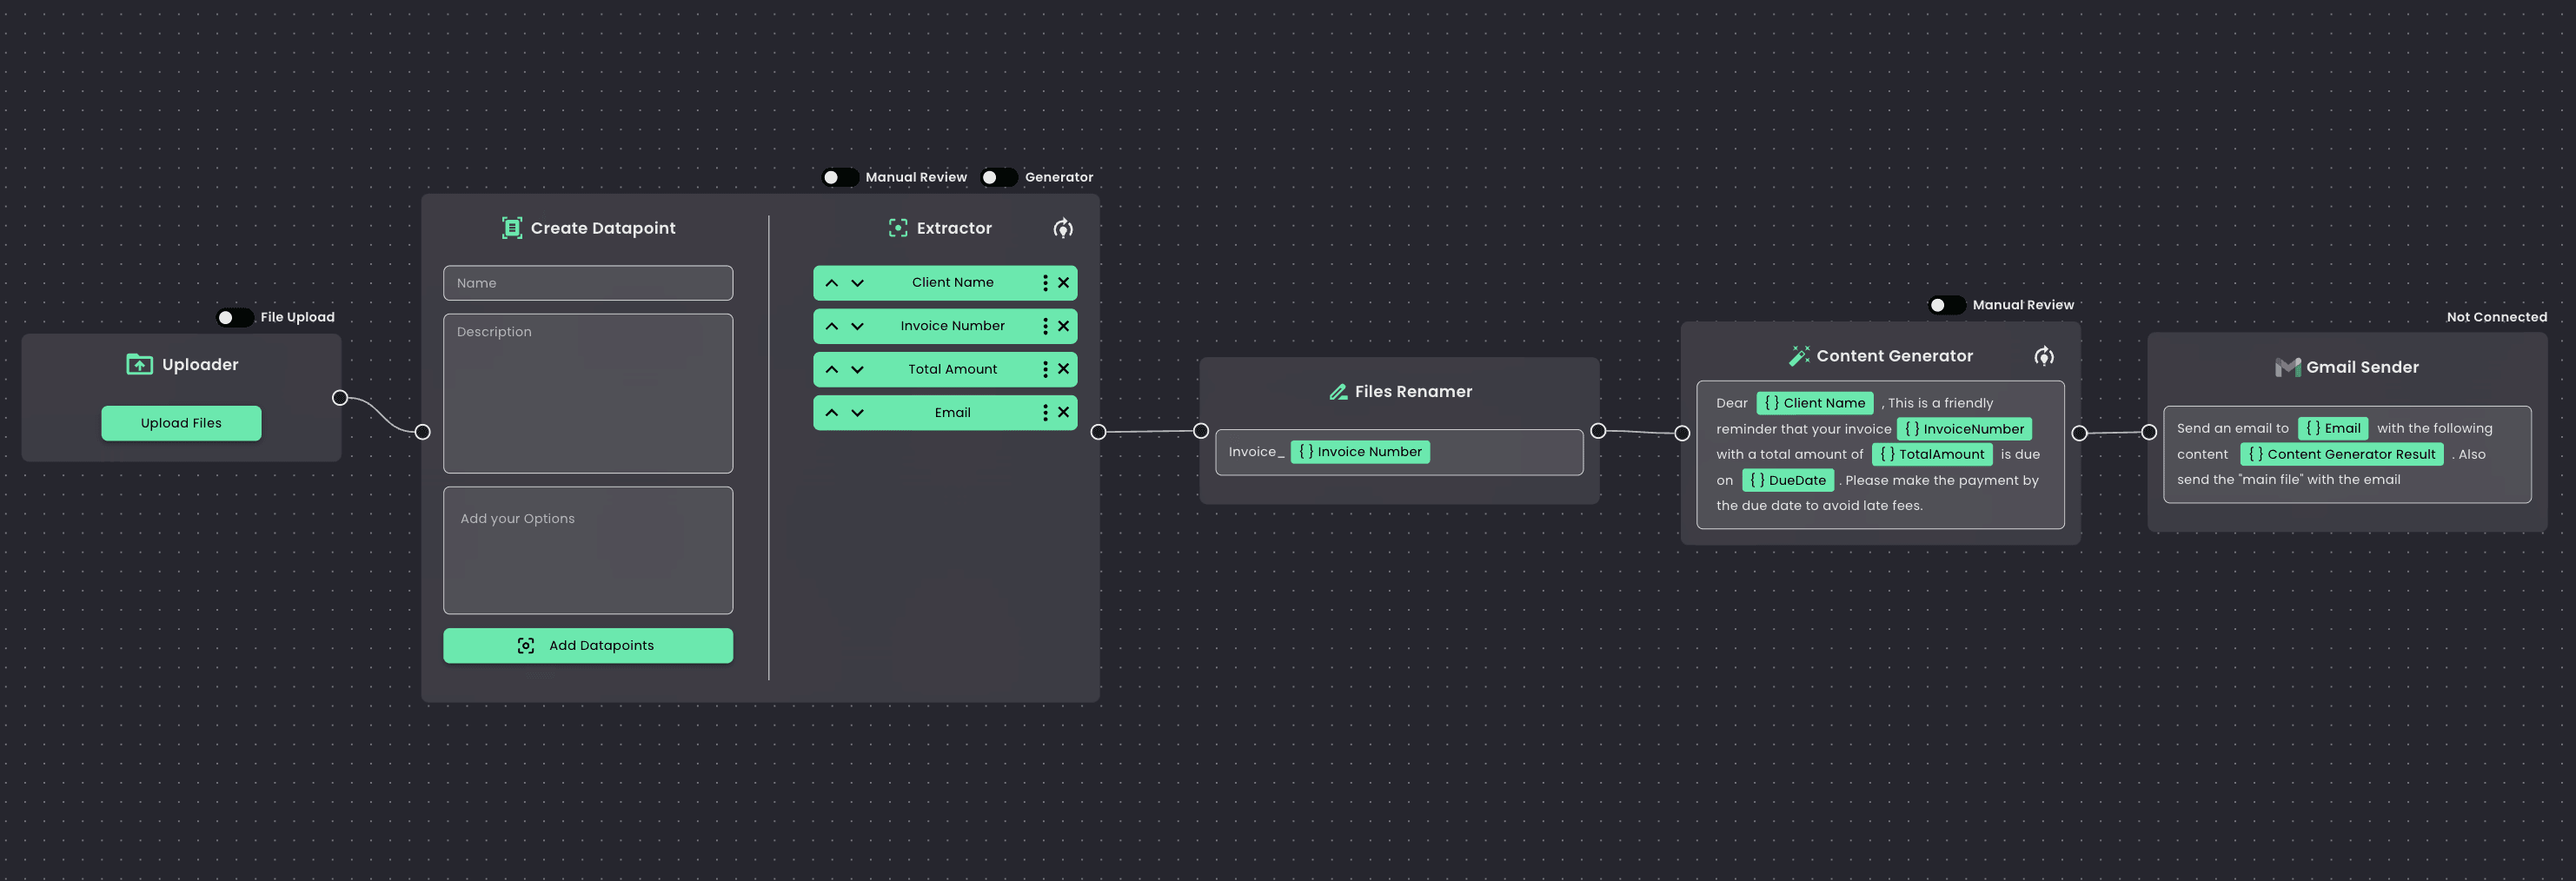
With just a few clicks, you can automate your workflows and make them more efficient—without writing a single line of code.
Monitor Agents: Real-Time Monitoring and Control
The Monitor Agents is your control centre for monitoring and managing Agents as they run. It provides real-time updates on the data being processed and gives you control over the workflow.
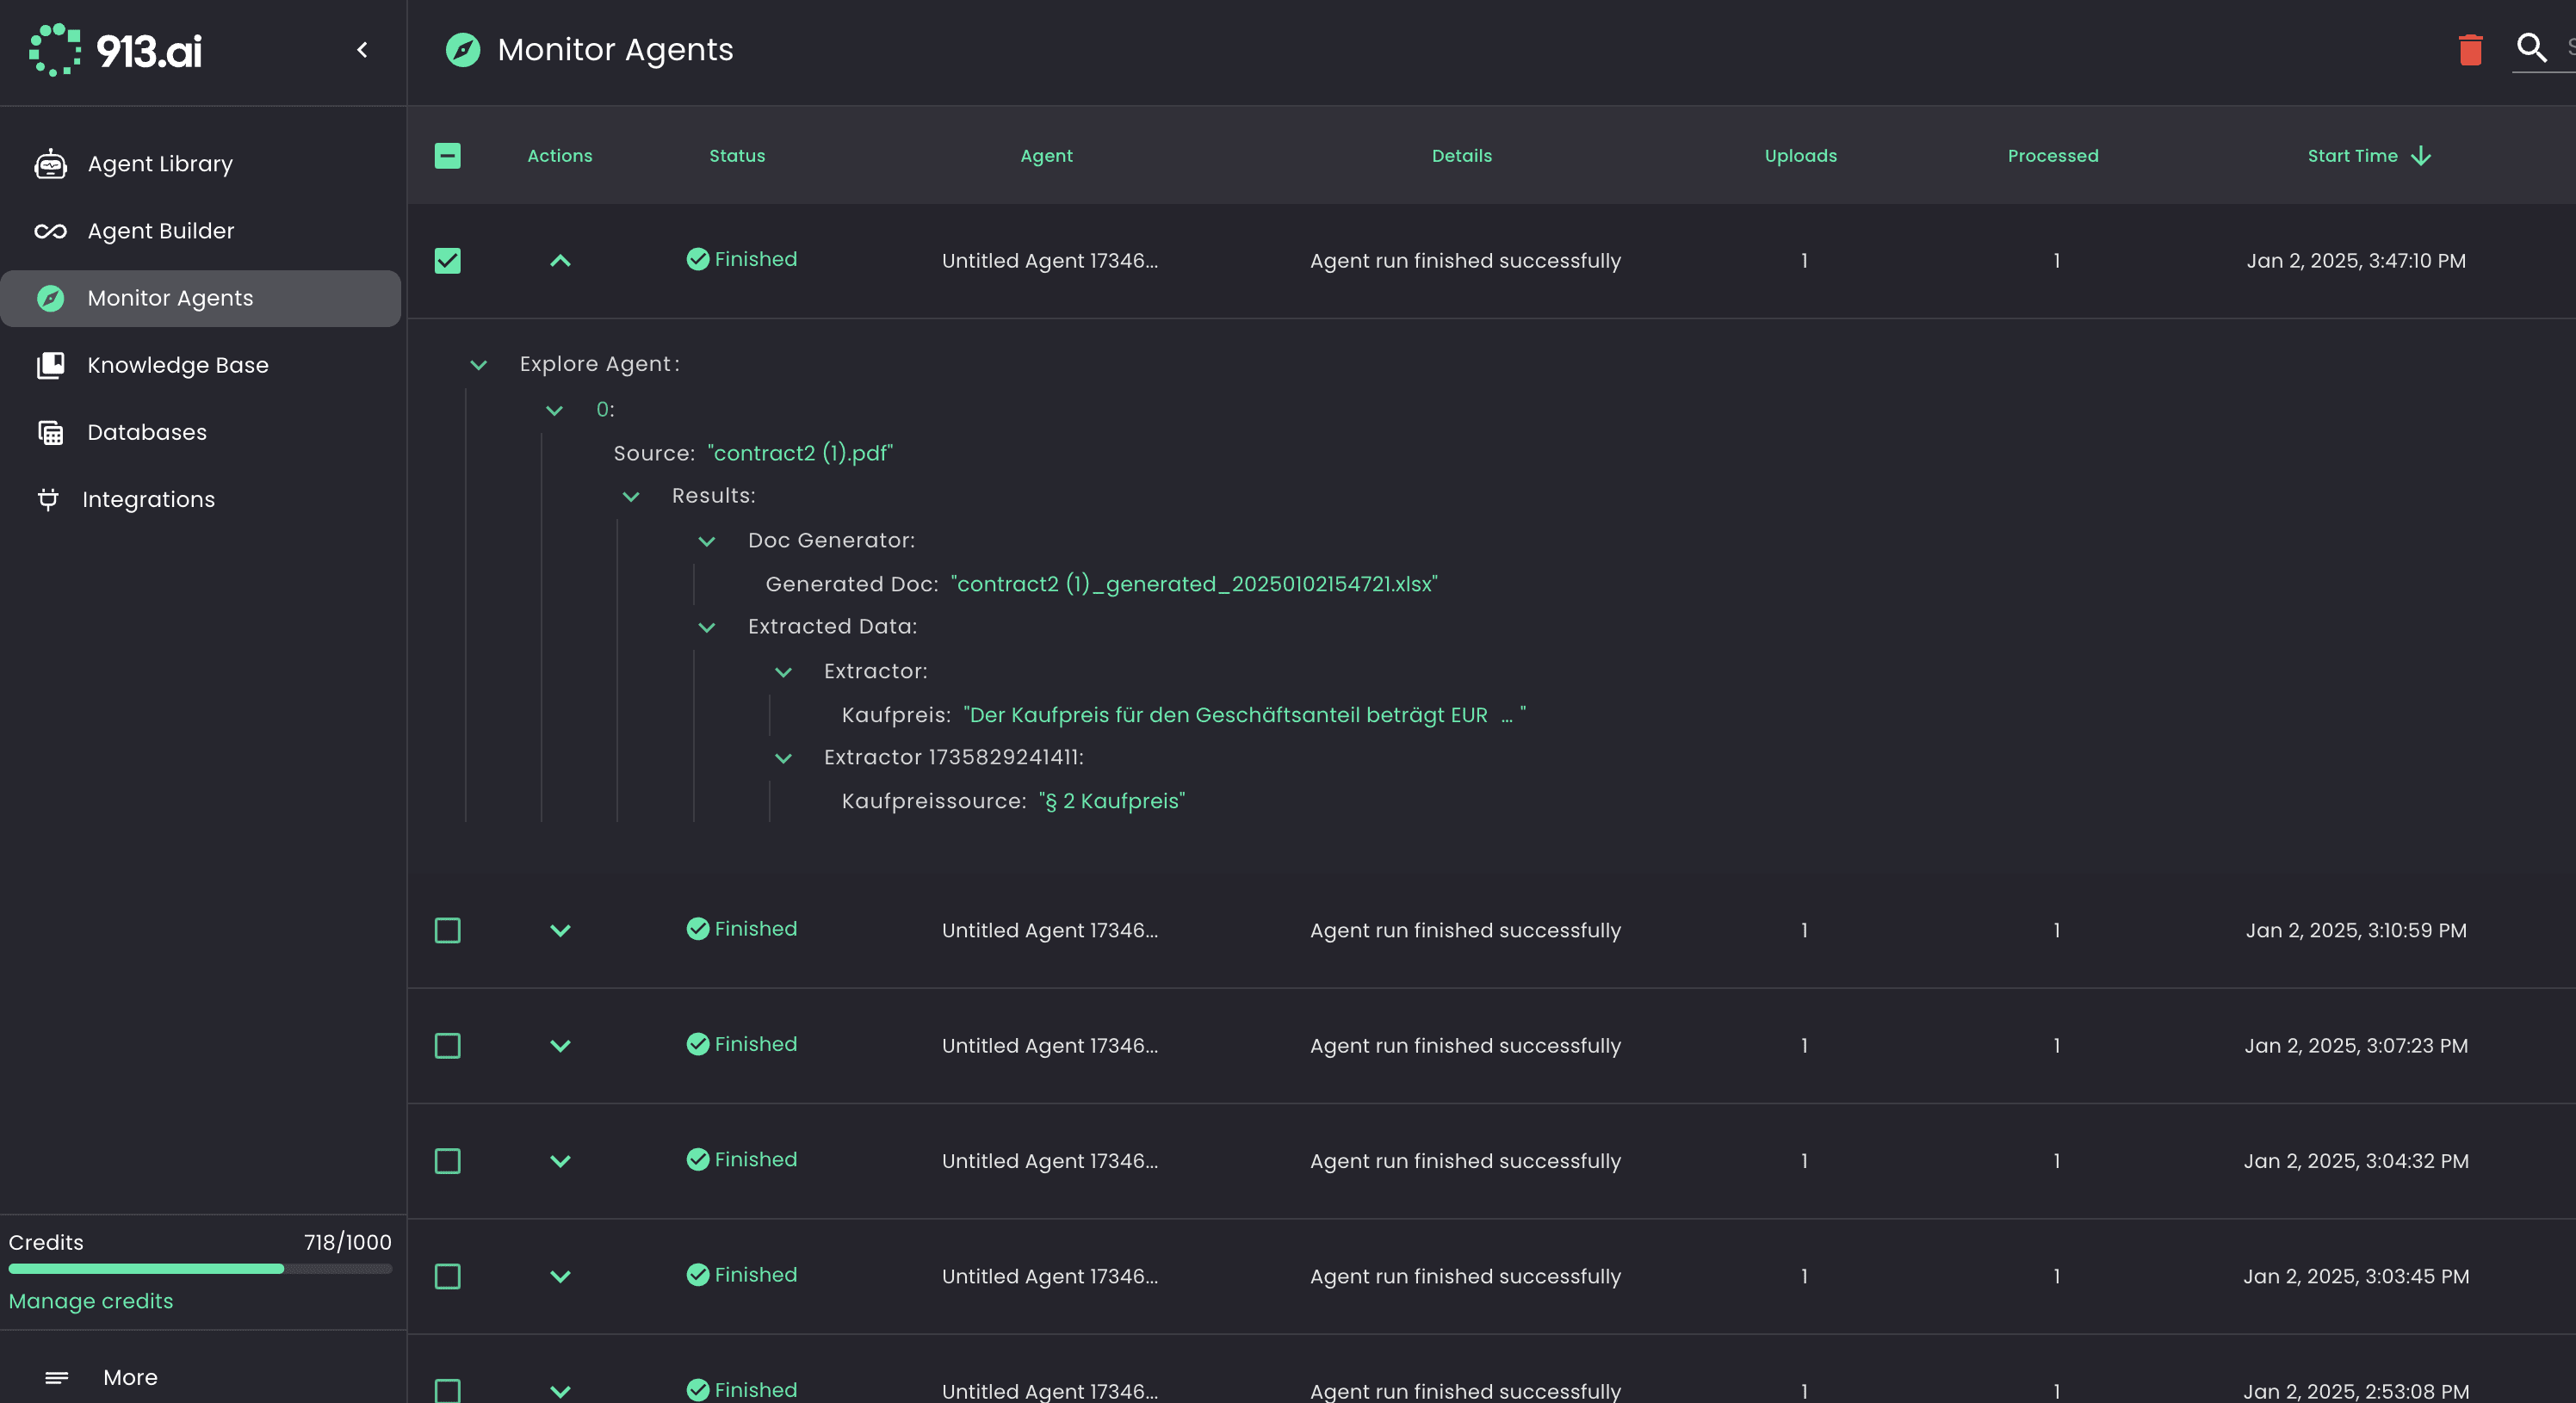
With Agent Explorer, you can:
• View real-time updates: See exactly how your Agent is processing data at each step.
• Pause or resume the workflow: If there’s a manual review, or you want to pause the Agent, you can do so and then resume when ready.
• Retry failed tasks: If something goes wrong, you can quickly retry any failed steps.
• Download processed files: Access and download the files that have been processed by the Agent.
• Fetch information: Pull insights from the processed data.
Monitor Agent gives you full control over your running Agents, allowing you to ensure that everything is working smoothly.
Next steps
Once you build your Agent and save it, 913.ai will run your agent each time your trigger event occurs.
You can view a log of all your Monitor Agents page, including all data that goes in and out of each Agent step, in your Monitor Agents.
If errors occur, reach out to us at: support@913.ai, and we will get back to within a few hours.
More like this


